Prep time15 minutes
Cook time15 minutes (cooked in 2 batches)
Total time30 minutes
Servings4 (as a topping) or 2 (as a snack)
Ingredients
- 1 Large Yellow or Sweet Onion (about 10-12 oz)
- 1 cup Buttermilk (or 1 cup milk + 1 tbsp lemon juice)
- 1 cup All-Purpose Flour
- ½ cup Cornstarch (This is the secret to extra crunch!)
- 1 tsp Garlic Powder
- 1 tsp Onion Powder
- 1 tsp Smoked Paprika (for color and depth)
- ½ tsp Cayenne Pepper (optional, for heat)
- 1 tsp Salt
- ½ tsp Black Pepper
- Cooking Spray (Avocado or Olive Oil spray works best)
Instructions
1. Slice and Soak (The Intense Prep)
- Slice the onion in half from root to stem. Peel the skin away. Now, using a sharp knife or a mandoline, slice the onions into very thin rings—approximately ⅛-inch thick. The thinner the slice, the crispier the final product.
- Place the sliced onions in a large bowl and cover them with the buttermilk. Ensure all rings are submerged. Let them soak for 10 minutes. This does two things: it infuses the onion with a subtle tangy flavor and, more importantly, it hydrates the onion cells, which helps the flour coating adhere. The acidity also helps tenderize the fibers slightly.
2. The Breading Station (Medium Intensity)
- While the onions soak, prepare your breading mixture. In a separate large bowl, whisk together the flour, cornstarch, garlic powder, onion powder, smoked paprika, cayenne (if using), salt, and pepper.
- Take a handful of onions out of the buttermilk, allowing the excess liquid to drip back into the bowl. Drop them into the flour mixture. Using your hands, toss the onions aggressively. You want to push the flour into every crevice of the onion ring. A good trick is to take a small handful of the flour mixture and “rub” it between your fingers over the onions—this helps create tiny clumps that will fry up into extra crispy bits.
3. Shake and Spray (Crucial Step)
- Transfer the battered rings to a wire rack or a clean plate. Here is the “pro-tip”: let them rest for 5 minutes. This allows the flour to hydrate and turn a bit gummy, which means it will stick to the onion during the frying process instead of falling off.
- Spray the air fryer basket generously with cooking spray. Place the onions in the basket in a single layer. Do not overcrowd. If you pile them, they will steam and become soggy. Depending on the size of your air fryer (e.g., 4-6 quart), you will likely need to do this in two batches. Spray the tops of the onions thoroughly with cooking spray. This is the only oil they will get, so don’t be shy, but don’t drench them.
4. Air Frying (The “Set it and Forget it” Phase)
- Set your Air Fryer to 375°F (190°C) . Air fry for a total of 12-15 minutes, but we will stop at the halfway point.
- At the 6-minute mark, remove the basket. Using a spatula or tongs, carefully toss the onions (they should be slightly set and starting to brown) to ensure they cook evenly on all sides. Spray them once more with a light coating of oil. Return to the air fryer and cook for another 6-9 minutes.
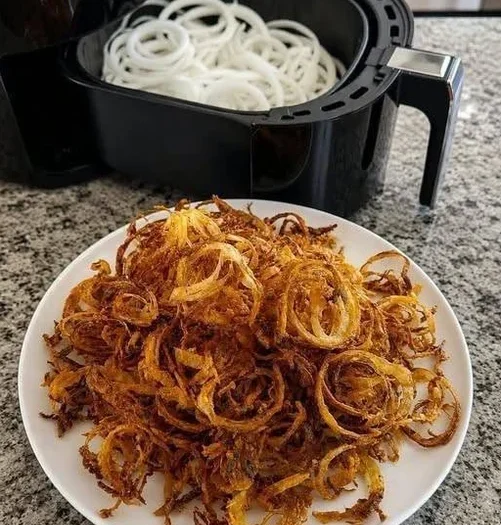
- The Visual Guide to Doneness: You are looking for a deep golden-brown color. They will darken slightly as they cool. The edges should look frizzled and crispy. Do not be alarmed if you see some loose bits of fried batter—those are the chef’s treat!
5. Cooling and Seasoning (The Final Touch)
- Immediately remove the cooked onions from the basket. Do not leave them in there to sit, or the residual heat will cause them to sweat and lose their crispiness.
- Transfer them to a paper towel-lined plate or a wire rack. Sprinkle immediately with a final pinch of salt to bring out the flavors. Let them cool for about 5 minutes. This is the critical “setting” period where the starches solidify, ensuring they stay crispy for hours.
Nutrition
Calories: 185 kcal · Protein: 6g · Fat: 3.5g · Carbohydrates: 32g · Saturated Fat: 0.5g · Fiber: 2g · Sugar: 6g · Sodium: 620mg
Visited 1 times, 1 visit(s) today
Tags: crispy, fried, fryer, onions Last modified: October 15, 2026